In this post we will guide you, step by step, how to prepare a blank Linux Mint installation for development with Ionic Framework.
For this post we created a new virtual machine (with rather low-end specs, but that’s not really important here) and installed Linux Mint 17.2 Rafaela 64-bit with close-to-default settings, i.e. we changed the keyboard-layout, that’s it. That way we hope to have a system that will be as close as possible to your Mint installs.
Contents of this post is no new information, but you’ll have everything together in one place – at the end you can find a list of links.
If you follow the instructions in this post, at the end you should be able to create new Ionic-projects from command line.
Please note you most likely do not have to enter your password if [YOUR_PASSWORD] appears here, but it might be possible, so if you are not being asked, skip it 😉
Preparations
Before installing new software we usually begin with updating all repositories and upgrading installed software to the current releases. to do so, please open a terminal [Ctrl+Alt+T] and type:
sudo apt-get update
[YOUR_PASSWORD]
…and later…
sudo apt-get upgrade
[YOUR PASSWORD]
Most likely the 2nd step will take a while, but you should do this on a regular basis anyways. However, after that you will have a fully-patched system.
Install Git
In your terminal, type
sudo apt-get install git
[YOUR PASSWORD]
That’s all. Really! Please verify your installation by typing:
git --version
You should see something like this:
Install cURL
CURL is a nice tool for fetching files from the internet and much more. If you are going to develop on your machine you might need it anyways. If you don’t know it, yet, you should get to know it. Install it with:
sudo apt-get install curl

[your password]
Install NodeJS
To install NodeJS it is highly recommended to add additional repositories before that. You can issue the following command (note the “-” at the end!):
curl --silent --location https://deb.nodesource.com/setup_4.x | sudo bash -
And after, that, as the previous script asks you to:
sudo apt-get install --yes nodejs
If you are not adding that repository (the curl-command above), you’ll be facing a problem: Unfortunately, NodeJS and another program, Amateur Packet Radio Node Program (that’s something that has to do with sending / receiving data packets via Amateur Radio), have conflicting names. We assume you don’t need that other software, so we can create a link to nodejs, so we can use “node” at command-line as expected:
tl;dr:
If this will not give a result as in the screenhot below:
node -v

You have to issue this command:
sudo ln -s /usr/bin/nodejs /usr/sbin/node
Please verify your installation with the above mentioned “node -v”. Result should be something like the screenshot above.
Install Cordova
Installation of Cordova itself is quite simple. The installation is done via npm (that ships with NodeJS). We install it as a globally available package with:
sudo npm install -g cordova
This installation is not very silent, so simply check the installed version by typing:
cordova -v
IMPORTANT: If you are planning to develop for Android (and if you have a 64-bit Linux Mint installed) you have to install some additional packages, because Android is basically a 32-bit architecture (yes, this ,ight change, but that’s how it is today). Please issue this command:
sudo apt-get install lib32z1 lib32ncurses5 lib32bz2-1.0
Installing Ionic
We are getting close to the finish line, we finally arrived at Ionic itself. Please run:
sudo npm install -g ionic
You might see some warnings, but as far as we know and as far as we experienced: no need to worry.
Confirm the installation with
ionic -v
At our system, this took a while, but finally it let us know:
Testing
Everything is installed, now let us check, if we can create a project. Of course, where to store your project is completely up to you – we will create a folder in “Documents”:
cd Documents
mkdir ionic_projects
cd ionic_projects
Please note you don’t have to create a folder for each project manually, Ionic does that for you. That means, in your projects folder, type:
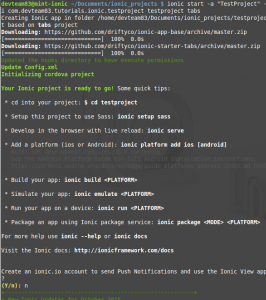
ionic start -a "TestProject" -i com.devteam83.tutorials.ionic.testproject testproject tabs
You should see the following messages appear on screen:

We answered the question at the end with “no”, but that’s up to you.
cd into your project-folder and run
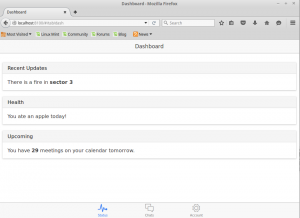
ionic serve
The result should be (may take a while):
Congratulations! You are done! Your first Ionic project is up and running. Have fun during further development. As usual, if you have questions or problems, please leave a comment!
Links


